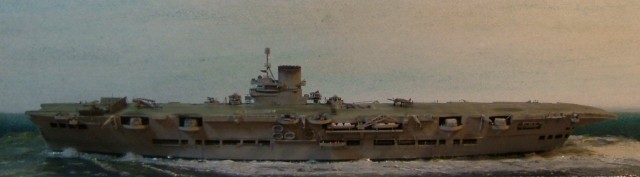
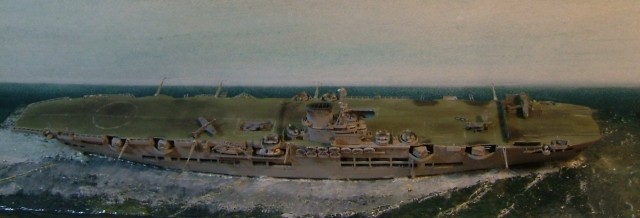
1/600 HMS Ark Royal
"Conducting Flying Operations" - Mediterranean, Summer 1941
"This model was started with the view to building her and fitting her out with the excellent WEM photo-etch set in a few weeks during the summer holidays. However, once the kit had been opened up and inspected, I realised that due to the ageing moulds, the kit was inaccurate and the parts had warped slightly. It would take a lot more work and time than I had expected.
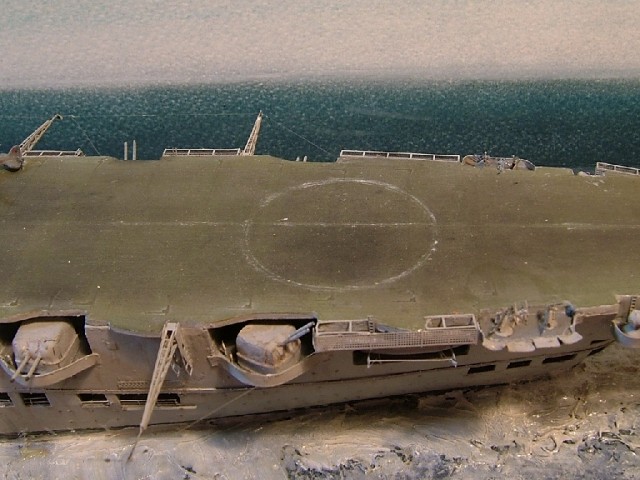
The flash was removed from the flight deck and the middle lift, which is moulded with sides and a base, was removed with a blade and sand paper. There was a ridge moulded on half way along which was meant to represent the arrester net, but as I was using the WEM PE I sanded it off. In this process the arrester wires were also removed; this proved to be a good thing.
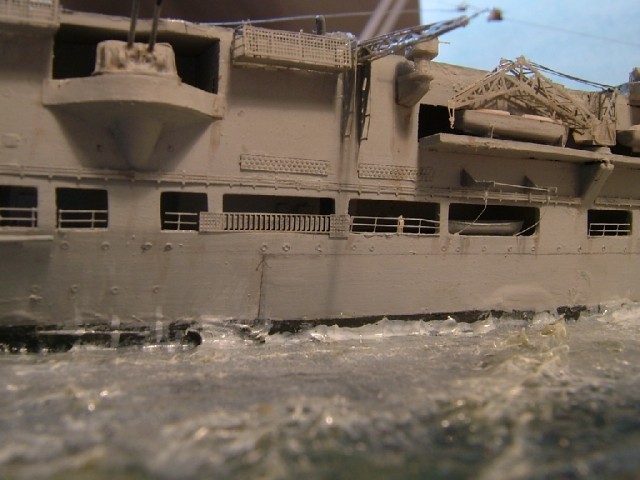
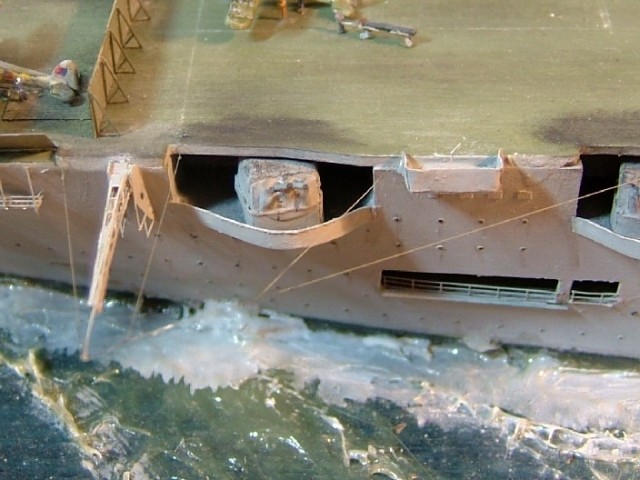
The openings along the hull were opened up and the inserts behind them had the mould attachments removed; WEM ladders and doors were added to them. The fo’c’stle and quarterdeck were put in place and had mushroom vents and fairleads added, the vents being made from the tops of tailor’s needles. The fo’c’stle had WEM chains to replace the moulded on ones. There was an open space around the fo’c’stle and quarterdeck so screens and tops were added. It turned out that these didn’t really make a difference and you can’t see them.
A hanger was then constructed out of the bottom of a match box, painted and glued to the underside of the flight deck. The flight deck was added to the hull and the many gaps filled with Humbrol filler.
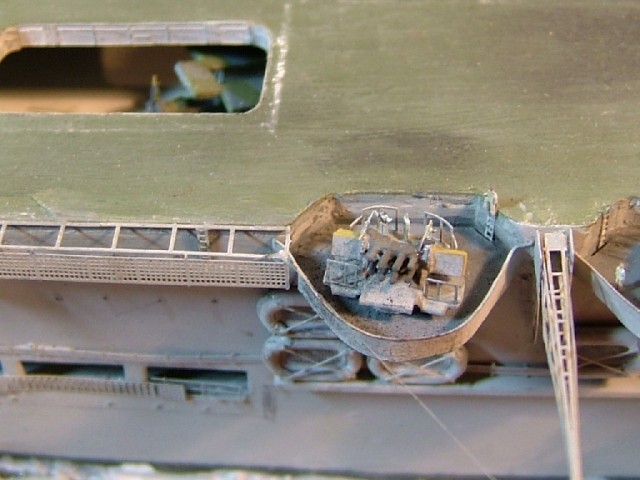
The next problem was the 4.5inch AA mountings along the hull. According to photos, the kit ones were far too small and had a back to them; the real ones were open mountings rather than turrets. I experimented with making completely new ones out of paper but couldn’t replicate the slots for the barrels. As a result I added a paper strip along the bottom of the kit part, giving the correct height. I then added one along the back top and sides to give the correct depth and give the idea of an open mount. The edge caused by the added paper on the kit turret was softened with white glue. The kit barrels suffered from being too thick, so wire was used instead.
The platforms on which the two pom-poms and the 4.5’s sit were scratch built to improve accuracy; the kit ones had edges that were far too thick so trusty paper was called on again to do the job. This idea of using paper to form the screens around the hull projections was also used for the Vickers mountings and search light platforms.
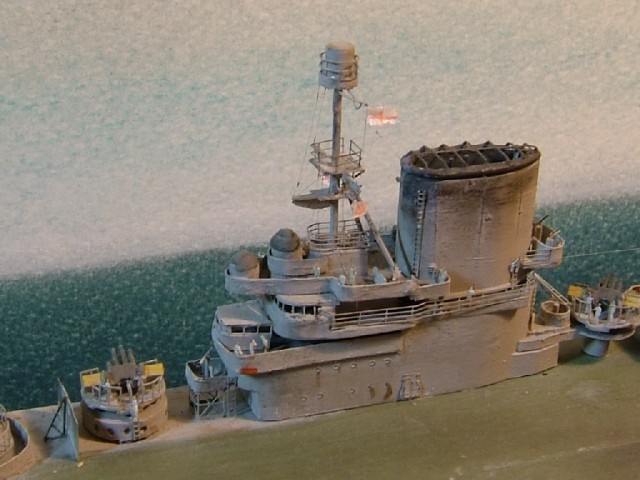
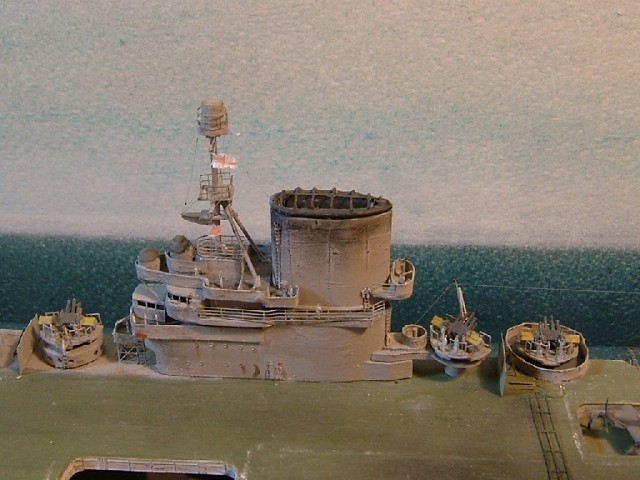
The superstructure needed major reconstruction and scratch building. The kit sides were kept, as was the bottom half of the bridge, the funnel and the extension going out of the back of the superstructure. The bridge windows were part of a WEM ladder, as were all the railings, doors and ladders on the funnel. The roof of the bridge and screens around the directors were paper. I then built the directors themselves. The bases are sprue and the tops are painted white glue.
The funnel cage was an altered WEM one. The photo etch was obviously 2D, but I wanted a 3D one so I extended the spars so that I could bend then vertically to form the cage. The extensions were made by removing the ring around the spars apart from where it connected to the spars, leaving longer ones. I used a knife to score the plate detail on the side of the otherwise plain funnel. This was then highlighted with pencil lead. The pipes running up the inside of the funnels are from the same wire as the 4.5’s. The mast was built out of brass rod with a WEM photo etch platform. All the rigging was stretched sprue and the flags are tissue paper painted with watercolours. The other directors behind the funnel are parts of the WEM Type 42 radar set, their platforms are paper. The platform with the range finder in front of the superstructure was built of paper, stretched sprue and the sides were from the WEM Sea Slug launcher.
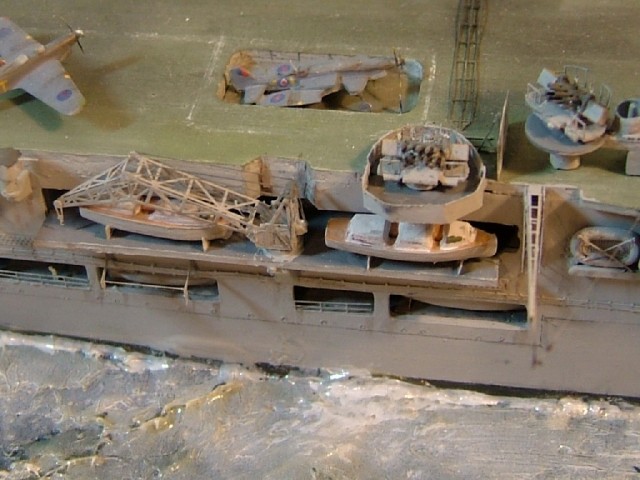
Once the superstructure was built it was the turn of the pom-poms. On my model of HMS Barham I had used the WEM photo-etch ones. The problem with was that the barrels, magazines and main body were too thin. This time I used the WEM resin ones but with the PE sights and railings on. The result was far more convincing. The WEM Ark Royal set had provided a pedestal and screens for the other pom-poms that are on the flight deck. However, they were designed for the PE pom-poms, which are slightly smaller than the resin ones. I again used paper to make the round screens and used a shirt button to make the pedestal. The pom-pom furthest aft behind he island and next to the Fulmar had to have a new deck built out over the hull because the Airfix flight-deck was the wrong shape. This was done with plasti-card and paper. At this point it might be of use to point out that all these smaller components, such as the 4.5’s, superstructure, pom-poms and aircraft were built and then stored separately until the main hull had been finished and the sea contructed.
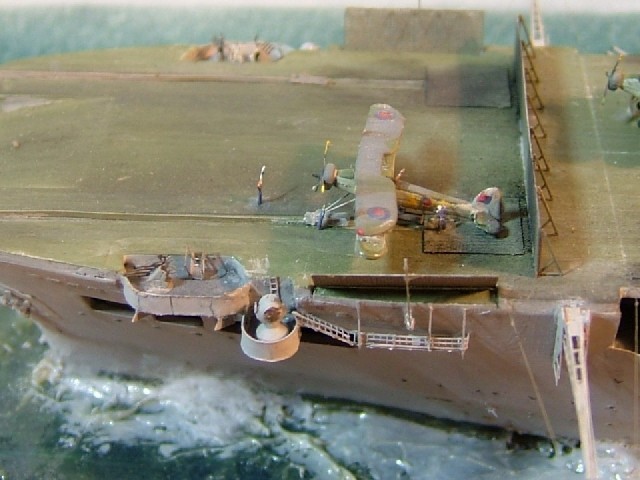
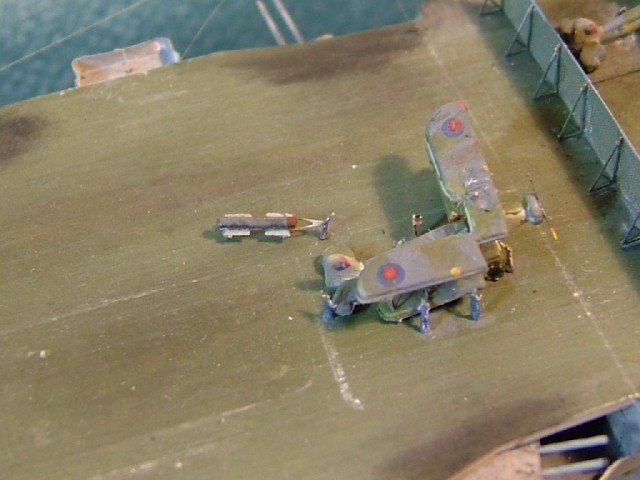
The Swordfish and Fulmars were a combination of scratch building, Airfix moulded ones, and WEM PE. The Fulmars were extremely easy to build. Firstly the moulded undercarriage, canopy, rudder and nose cone were removed. Secondly the aircraft was painted and the markings added, using a pin head. The canopy was made out of layers of white glue to give a glossy transparent look. The WEM propeller was added and the nose cone replaced and finally the rudder was put back, but at an angle. The Swordfish were a little trickier. First the lump under the upper wing and the ‘undercarriage’ on the lower wing were removed. The Swordfish in the hanger has folded wings, which had been moulded like that. The one on the catapult has straight wings; these were also moulded as such. However, the one being prepared for launch had to built with one wing being unfolded. This was done by removing one wing of a ‘straight’ set and gluing back on in the folded position. When all these alterations had been made the fuselage and wings were painted and given markings. Once that had been done the PE struts, propellers and undercarriage were added. The boss of the propeller is stretched sprue. The torpedoes are also stretched sprue. The torpedo trolley is made out of the magazines for the Lewis guns. The catapult rails and shielding nets are also WEM. I then took a break from the detail-building and decided to put the hull in the sea and finish it off.
The sea was made by painting a plywood base in Acrylic paint. The hull was painted with Humbrol paints, given a water line and then CA'ed in placed. Artist’s shaping gel was used to form the shape of the sea and the breaking wash. The ‘white water’ was then painted on. After a few days, when it had all dried a layer of glossy artist’s acrylic gel was added. Now I had a solid base, which meant the hull didn’t have to be handled and the finer details could be put in place. The WEM PE degaussing cable was added. According to photos of Ark, the degaussing cable went all around the hull. However, the WEM instructions stated that it only went around about 2/3rds. By the time I discovered this it was too late. The scuttles were highlighted with pencil lead, as were all the details on the hull and an armour belt was drawn on. Ideally a plasti-card one would have been used but I didn’t have any to hand. The name was added on the stern by printing it onto plain decal paper and then placing on the hull.
The boats and davits were then put in place. I used the kit’s boats apart from the whalers. The whalers were taken from a canibalised Italeri HMS HOOD. The motor boats had small pits on the deck, so these were filled in with white glue. Most of the davits were PE but for some reason there weren’t enough, so I had to use paper soaked in CA to make up the numbers. The boats were put in place on paper chocks. Now that the boats were in place the WEM PE railings and cranes could be added. The lines going from the davits to the boats were stretched sprue. On the port side there is a manned whaler which has been swung out. According to references there was always a manned whaler ready to pick up any aircrew who ditched during flying operations.
Before the superstructure, guns, aircraft and men were added I drew on the deck markings using a chalk pencil, ruler and compass. The advantage of chalk is that there is guaranteed to be a straight line as long as you used a ruler. With paint this is not the case. The other draw back of paint is that it is difficult to remove without taking the deck paint with it. The final advantage of chalk is that it is light and faded, giving the effect of weathering and scaling down colour intensity.
All the remaining separate parts were put in place. The guns were put at different angles in order to give the appearance of the ship being very much at war. The aircraft were arranged as if the two Fulmars have returned from a patrol and a being struck down to the hanger, whereas the Swordfish are coming up from the hanger and are preparing to be launched. All the figures are GMM 1/700 PE. They have been painted to represent Royal Navy tropical uniform, as would have been worn in the Mediterranean in summer. The pilots are in flying clothes and the aircraft handlers in blue overalls.
The penultimate step was to add the WEM PE aerials and walkways around the after part of the hull. The forward walkways are scratch build from ladders, railings and stretched sprue. The model was then weathered using charcoal, pastels and watercolour. The flight deck has black marks around the 4.5s to simulate the effect of prolonged firing. The deck as also been weathered to give the effect of wear caused by aircraft landing and taking off. The final step was to add the delicate wires between the aerials, made using stretched sprue. Due to accidents this was done at least two or three times!
As you can see the model turned out to need a lot more work than was expected. She took about 2months to build during the school holidays. The only regret is that I didn’t make the wings of the Swordfish thinner; Oh well! Despite the unseen work she was great fun and I am extremely pleased with the results. I would recommend this kit along with the WEM set."